Slow streaming video can but a damper on your internet video viewing experience. If you are using service like youtube.com or Vimeo.com. You are more than likely are streaming videos using a DSL connection. Most videos should load and play simultaneously using the streaming video technology. However, your PC may be inhibiting you from taking full advantage of this technology. This page will give you useful tips to troubleshoot your slow streaming video problems. However, lets begin with the basics to get you started. Special Note: By simply cleaning and organizing your computer registry you can free up tons of resources for video streaming and other high performance computer task. Click Here to Learn How!
How Does Streaming Video Work?
Streaming video or streaming media allows the Web user to avoid waiting to download a large file before seeing the video or hearing the sound. Instead, the media is sent in a continuous stream and is played as it arrives. The compression of the video allow it to be played simultaneously. Depending on your choice of media player and the file’s compression rate, the time it takes for the video to stream may vary.
The file is hosted on a server which can “multi-cast” the same file to multiple users at the same time. When you click on the on the video it is partially loaded before you can access it. This is known as “buffering”. Now lets take a look on how to cut down on buffering time, stop slow streaming video and eliminate choppy PC video playback .
How to make Streaming Video and Media load faster.
There two aspects that are responsible for the slow streaming video. This is computer ability to “play” the file and your computer’s ability to “receive” the file.
Step #1–Create More Resources to Receive the file
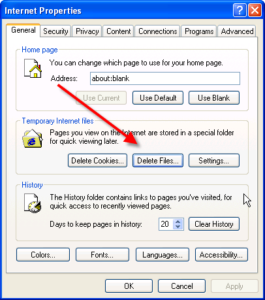
Receiving the video requires that you have the proper amount of space needed to load the video temporarily. The video will be loaded in to your Web Cache. If this area is full, the video will be slow streaming. To clear the web cache 1. Quit Internet Explorer, Firefox, or any other web browser
2. Click Start, click Control Panel, and then double-click Internet Options.
3. On the General tab, click Delete Files under Temporary Internet Files.
4. In the Delete Files dialog box, click to select the Delete all offline content check box , and then click OK.
5. Click OK.
+ You can also delete your browser’s history by simply pressing
CTRL-SHIFT-DELETE
+ Close Applications
Stuttering, choppiness and freezing can be linked to lack of RAM. Also some programs maybe using your bandwidth. When you stream your videos, cut down on the number of background programs running. A lot of slow streaming video problems can be attributed to excess programs.
- Close all unnecessary windows
- Shutdown all other programs
- Disable Browser Add-ons and Toolbars
- Limit yourself to one video at a time
Open the task manager by pressing CTRL-ALT-DELETE. Click the application tab. End all programs, you are not using. You can also speed up your computer and streaming video by cutting down on your startup programs. Here is how:
1. Click Start
2. Click Program Files
3. Choose Accessories
4. Click RUN
5. Type MSCONFIG, then Enter
6. In the System Configuration window, Click Startup
7. Uncheck all the programs that are unnecessary
Step #2–Stop Choppy Playback
Choppy playback can be directly related to your computer’s performance, specifically lack of free resources. You should streamline and tweak your computer to stop slow streaming video problems. One way to do this clean an organize your computer. So, if you haven’t cleaned your registry in a while. This is necessary step to stop game lag, slowdown and overall destruction of your system’s stability. Your registry holds all the information regarding updates, installs, un-installs etc. Each one of those events has a key. That key needs your PC’s resources and free space. So, if you clean your registry, you make more resources available for speed. Do a registry scan if you got more than 20 errors you should clean it.
Slow Streaming Video may be directly related to your corrupted registry, Click here for a FREE Scan!
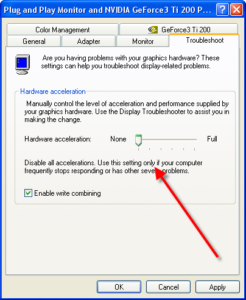
Another way to stop choppy playback and slow video streaming is to Disable the use of hardware acceleration. Hardware acceleration can cause choppy PC playback, application crashes and slow streaming video problems. This occurs because the option forces all video players to conform to one setting. By disabling this option, the individual player can set based on the requirements of the file.
Disable Hardware Acceleration by using these steps:
1.Click on Start
2.Click Control Panel and Click Display
3.Select the Settings tab and click on the Advanced.
4.Click on the Troubleshoot tab.
5.Disable the hardware acceleration completely by dragging the slider to the extreme left.
In Vista
1. Click Start
2. Click Control Panel, choose Appearance and Personalization, click Personalization, click Display Settings, and then click Advanced Settings.
3.Under the Troubleshoot tab, and then click Change Settings.
In Windows 7
1. Click Start
2. Choose Control Panel
3. Click Appearance and Personalization
4. Choose Display
5. Click Change Display Settings
6. Choose Advanced Settings and Click Troubleshoot tab
7. Click Change Settings
8. Move the Hardware Acceleration slider to none
+ Eliminate Long Load Times and Excessive Buffering
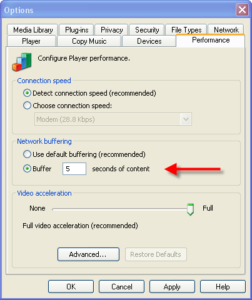
Most players will allow you to alter their buffer settings.Below is an how to change buffer setting in Media Player.
You can change the default buffer settings in Windows Media Player, use instructions below:
1.Start Windows Media Player
2.Click the View
3.Click Options
4.On the Advanced tab, click Streaming Media(Windows Media)
5.Click Change to alter the buffer settings.
+ Increase Virtual Memory
The final step but this step is often not needed to speed up slow streaming video. You can change your virtual memory by altering amount of free resources for your computer to use for it, in a sense making the spare bucket bigger. Virtual memory uses free space as a resource. So you can change the the amount free space reserved for the Virtual memory.
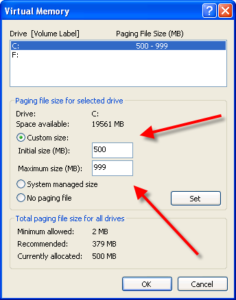
When you get to the Virtual Memory menu select the Custom Size check box. Then choose the initial size and the max size. Depending on how much free space you have you can choose what that amount of free space you want.
1.Click Start, and then click Control Panel.
2.Click Performance and Maintenance, and then click System.
3.On the Advanced tab, under Performance, click Settings.
4.Under Virtual memory, click Change.
5.Under Drive [Volume Label], click the drive that contains the paging file that you want to change. In most computers its C:
6.Under Paging file Size for selected drive, click to Custom size check box. You can enter the amount of memory you would like to reserve for Virtual memory by entering the initial and maximum size.
7.Click Set
Hot tip: Keep the initial and maximum size the same to cut down on your CPU access. This will stop your CPU from constantly change your Virtual memory paging size. Also set the size 1.5 times higher than your physical memory.
Step #3–Tweak Your Internet Connection
Simply tweaking your connection to get the best speed possible will do wonders from streaming videos online. Remeber that bandwidth is one of the key factors in fast buffering and instantaneous streaming. There are several ways in which you can speed up your internet connection.
Ways to Speed Up your Internet Connection
- Stop Background Updating
- Port Blocking
- Control Your Antivirus
- Improve Cabling
- Using DNS Servers
Step #4–Lowering Video Quality
Streaming HD video or high quality videos takes a tremendous amount of your internet bandwidth. If you do not have a super fast connection, you will have to buffer videos to play them at the peak quality. A good way to speed up your streaming is to simply lowering the video quality. This can be done in all the major streaming sites. Just look for the option button in the lower right corner of the player.


