Can You speed up Windows 7? Of course! Windows 7 is a great operating system. Its fast and light. But there are ways to make it better. You can make Windows 7 faster with just a few simple tweaks. Learn how to speed up Windows by eliminating errors and registry problem, click here!
Step 1: Enable Prefetcher
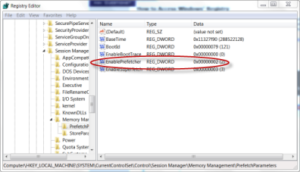
Prefetcher is a function that allows Windows 7 to preload data used to run in start application. With this option enabled, you will see a significant boost in performance of application. Here is how to use it:
1. Click Start
2. Click Run
3. Type Regedit into the command line and press enter. The registry should load for your review.
4.Locte registry key:
HKEY_LOCAL_MACHINE>SYSTEM>
CUrrentControlSet>Control>SessionManager>
MemoryManagement>PrefectParameters
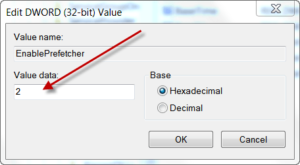
5. Double Click EnablePrefectrer on the right pane of the window
6. Change the Value to 2
7. Click Ok and Restart
Step 2: Increase CPU Cores
You can improve Windows 7 speed by increases the amount of CPU cores that are used during boot time and other functions.This will significantly cut down on the boot time. Here is how:
1. Open your Start menu.
2. Click Run
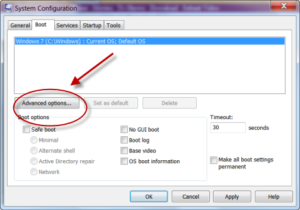
3. In the command screen type mscofig
4. Hit Enter
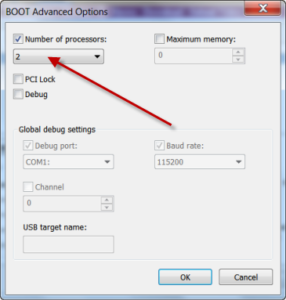
5. Click the Boot Tab and Choose Advance options..
6. Under Number of Processor, enter the number of processor your computer has: 2 for dual core and 4 for quad core.
7. Restart.
You can increase your CPU Speed with a number of easy tweaks
Step 3: Turn off Aero
Aero is an beautiful visual feature. It allows you to display has animations, gloss and transparency to Windows. However, it a resource hog. You can turn it off to free up a ton of RAM that can be used to speed up Windows.
1. Right Click the Desktop
2. Choose Personalize
3. Choose Windows Color at the bottom, then unchecked Enable Transparency
4. Click Apply Basic Theme
Step 4: Power Options(Great for Laptop Users)
Windows 7 has an awesome power management plan. It shifts power to essential hardware components and application depending on the power level or option that you’ve designated. The beauty of this feature is that you can increase Windows 7 performance by choosing the high performance feature. This option will ensure that all your application and hardware are receiving maximum amount of power. Here’s how:
1. Click Start
2. Click Control Panel
3. Choose System and Security
4. Click Power Options
5. Click Show Additional Plans, Choose High Performance
Step 5: Use ReadyBoost
Yes, this Windows 7 feature actually works. However, you do need a fast flash storage device such as a high quality SD card or USB drive. Readyboost can speed up Windows 7 boot by using your the temporary storage device as virtual RAM. This feature works best for low end system with limited RAM and resources because it adds an extra bit of RAM. So, if you have a higher end system, you might not notice the results. However, net books and computer with low RAM should be happy with the results.
Step 6: Enable Write Caching
You can speed up both your hard drive and CPU with one click. Write caching is a Windows 7 feature that allows your computer to delay data slated to be written to the hard drive. The Data is instead held in a temp space which frees up your hard drive for other tasks. Your CPU is also removed from the constant need to instruct your hard drive to write data to the hard disk. This action is slated for a time when your computer less active. This will definitely speed up Windows 7 by freeing up a ton of resources. To enable Write caching, follow the instructions below or watch the video:
1. Click Start
2. Choose Computer
3. Right click your hard drive and choose Properties.
4. In the Local Disk Drive Properties, choose Properties.
5. Select Settings and click the Policies Tab
6. Finally choose the option to Enable Write Caching


